Photograph Your Work: Simple Techniques for Professional Results (Without Buying Additional Equipment)
When it comes to showcasing your work—whether documenting a piece before sending it to its new owner, adding it to your online store, or sharing it on social media—high-quality photography is essential. Professional images help highlight the craftsmanship behind your creations, but you don’t need to invest in expensive equipment to capture stunning photos.
If you’re wondering how to photograph your work on a budget, this guide will walk you through practical, cost-effective methods to create impressive visuals. With a few strategic techniques, you can focus more on your craft and less on the gear, while still achieving professional results.
Essential Tools You’ll Need:
- The piece you want to photograph
- Light sources (more on this below)
- A camera (your phone will suffice)
- Items for reflection and diffusion (detailed in the next section)
- Optional: Decorative backgrounds (to enhance the image)
- Tape (likely to be needed at some point)
- Optional: A phone holder or tripod (for steady shots)
Section 1: Understanding the Importance of Light
When you’re wondering how to photograph your work effectively, lighting is the key. Without proper lighting, even the most well-crafted pieces can look flat or unappealing. Here are a few principles to keep in mind when working with light:
1. Positioning Your Work
For stable shots, consider photographing your piece either in a vice or on a flat benchtop. Both surfaces will keep your subject secure and provide a solid base for optimal lighting.
2. Moving Around the Object
Once your work is set, experiment with different angles. Moving around the piece allows you to see how the light interacts with it, helping you find the most flattering angle.
3. Adjusting the Light Source
It’s crucial to manipulate your light source, not just rely on its default position. Moving the light around the piece will help you understand how shadows and highlights will affect the final image, giving you greater control over the outcome.
Sidebar: Consider Your Background
The background is just as important as the object itself. Simple, neutral backgrounds keep the focus on your piece. The environment in which you photograph your piece will influence the overall tone of the image. Consider using:
- Wood
- Printed sheets
- Velvet or leather
- Rocks, sand, salt, or pebbles
- Plants
- Glass
- Vise/bench/Satellite® (if applicable)
Be mindful of how light reflects off the surface your object sits on. For example, photographing your work on a reflective surface like glass at a low angle can create a stylish reflection, adding depth and sophistication to the shot. Additionally, the angle of the camera relative to the object will affect how much of the background is reflected in the work. Shooting at a parallel angle minimizes reflections, while shooting at an angle can highlight them creatively.
Section 2: Effective Lighting Methods
While high-end photography equipment is often used for controlled lighting, there are many ways to replicate these techniques with common household materials. Here are a few methods to improve your lighting:
Diffusion
If you’re asking how to photograph your work with soft, even lighting, diffusion is your answer. Diffusing light helps soften its intensity, creating even, flattering illumination. Professional photographers often use softboxes, but you can achieve similar effects with inexpensive materials such as:
- Wax paper
- Parchment paper
- Plastic grocery bags
- Milk cartons
- Packing foam
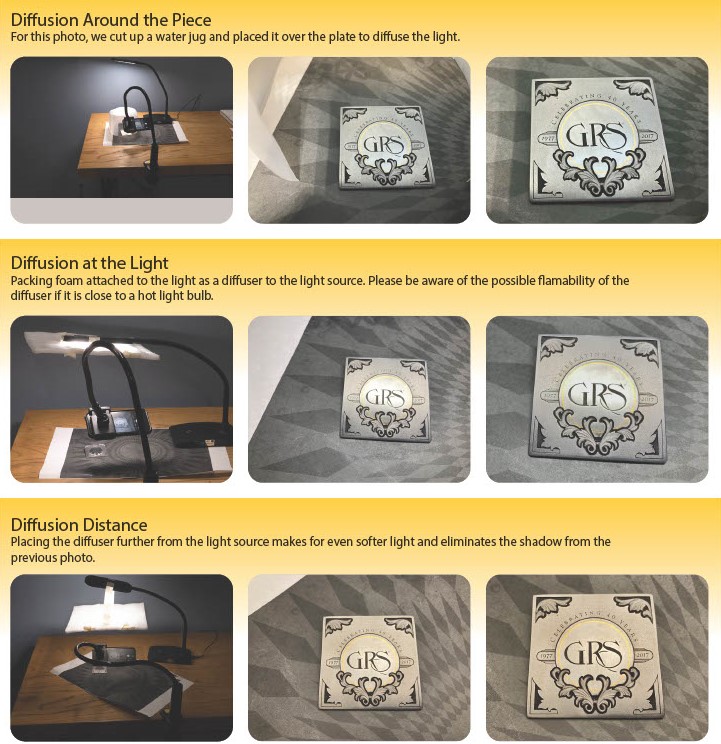
To diffuse light effectively, there are two main approaches:
- At the light source: Place your diffusion material close to the light source to soften the light before it reaches the object.
- Around the object: Hold the diffusion material around the piece to soften the light hitting the object itself.
Be aware of the heat produced by the light source. Materials like plastic or foam can melt if placed too close to high heat for extended periods, so exercise caution.
Reflection
When learning how to photograph your work with balanced lighting, reflection is another useful technique. Reflecting light helps fill in shadows and can illuminate the object more evenly. Use white surfaces like foam core or cardstock to bounce light onto your piece. These materials are inexpensive, lightweight, and easy to position in various configurations to reflect light exactly where needed.
Natural Light
When considering how to photograph my work outdoors or indoors, natural light can often provide the best results. The key is to avoid harsh, direct sunlight, which can create strong shadows and highlights that distract from the object. On cloudy days, you’ll benefit from soft, diffused light that reduces shadows and highlights, creating a balanced image.
If shooting outside during midday, find a shaded area to avoid the intense midday sun. Indoors, position your piece near a window with indirect sunlight for soft, even lighting. Early morning or late afternoon sunlight also provides dramatic shadows, but be mindful of the warm, yellow hue that it imparts.

Section 3: Lighting Different Types of Objects
Different objects require different approaches to lighting. Understanding how light interacts with both flat and three-dimensional objects is key to achieving the best results. Here’s how to approach both when wondering how to photograph your work:
Flat Objects
Flat objects are the easiest to photograph as their surfaces allow for even lighting. Position your diffused light or reflector so that it hits the surface of the object evenly, filling in any shadows without overexposing areas of the piece. If the light is hitting the object correctly, it will appear bright and well-lit, with no harsh shadows disrupting the image.
3D Objects
Three-dimensional pieces require more thoughtful lighting. Unlike flat objects, 3D items naturally cast shadows that add dimension and interest to the photo. While it’s important to aim for even lighting, don’t attempt to eliminate all shadows, as this can make the piece look flat. Allow natural shadows to form in areas where they would naturally fall.
A useful technique for achieving proper lighting on 3D objects is to move your hand or a brightly colored object around the piece. The reflected light from your hand will indicate where the light source or reflector needs to be positioned. This method helps you identify which areas require more light and where shadows should remain.
Bright Cut Objects
If you’re photographing bright-cut items, which feature intricate engravings or designs, this type of lighting requires extra attention. Light must be carefully directed to highlight the fine details without losing the overall form of the object. Adjusting your light sources to accentuate the cuts and texture can elevate the photo and bring out the craftsmanship.
Conclusion
Now that you know how to photograph your work on a budget, you can confidently create high-quality images without the need for expensive gear. Professional-quality photos are achievable with a thoughtful approach to lighting and composition. By experimenting with diffusion, reflection, and natural light, and adjusting for different types of objects, you can capture beautiful images of your work that help you stand out, whether you’re documenting it for personal use or promoting it to a broader audience.
Mastering these techniques will not only improve your photography but also elevate your brand, allowing your work to shine through in every shot.
For more tips and tricks on getting the best photograph of your work, you can check out an article written by Sam Alfano and published in the FEGA Engraver Magazine or you can take a look at Issue No. 07 of the Learn Magazine.